LUVTruck.com

phpBBV3 Message Board
It is currently Sun Jul 20, 2025 8:01 am

All times are UTC - 6 hours


Post new topic Reply to topic  [ 523 posts ]  Go to page Previous  1 ... 19, 20, 21, 22, 23, 24, 25 ... 27  Next
Author Message
 Post subject:
PostPosted: Fri Feb 02, 2007 7:33 pm 
Offline
Assimilated into LUVTruck.com
User avatar

Joined: Mon Oct 23, 2006 2:50 pm
Posts: 917
Location: Jeff City, Mo
I always break my engine in the way I am gonna drive it. After initial cam break in if it is after market. Stock built engines in my opinion too just needs to get the rings seated good.

_________________
Too much to do and not enough time or money!
Courage is the other side of fear!
Pain is the weakness leaving the body!


Top
 Profile  
Reply with quote  
 Post subject:
PostPosted: Fri Feb 02, 2007 8:49 pm 
Offline
Assimilated into LUVTruck.com
User avatar

Joined: Sat Oct 28, 2006 3:33 am
Posts: 993
Location: North Georgia
FullaLuv wrote:
I feel so mad that I didn't break it in right and I have to do it all over again. Well this time around I will be much more careful, cuz I want to have a LUV running down the road trying to loosen my load. (BlackLuv can have something to say here) Anyhow, it's amazing how much you don't remember after being out of it for some years.


Singing Take it easy by the Eagles or is there just a funny similarity here?

FullaLuv wrote:
It sounded the best I'd ever heard it, and really had awesome response from the throttle. I didn't race it, or try to spin out, or any of that.


AH HA! So you was giving it hell when she gave up? :lol: Just kidding


FullaLuv wrote:
I admit I was pushed for time. I didn't use any plastigage on the installation of the main bearings or rod bearings. I just put new standard-size parts on it because I was seeing the standard sizes coming off. So I think what happened was I didn't get the right size parts in, and the crank wasn't ready for the new bearings either, and some of them must have turned. I'm going to be able to look at it better when I get it out and put it on an engine stand.


This may be a major factor in what really happen the bottom end may have been warn a lot more the you expected there for you had to much clearance on everything and it started spinning bearings.

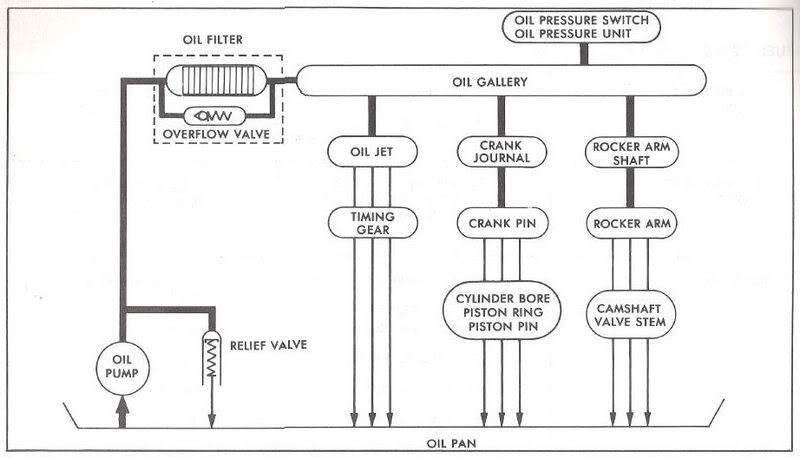
There other then just having the oil pump lubricated there is no way I entrust in better then just as already said pulling the coil wire and turning it over until you get oil pressure and lubrication to the top of the head.

I must agree at 1st I thought it may be possible for it to be the pump but I think it was more to deal with the clearance of the bottom end. Since your valve train goes unchanged they will be no need for cam break in time. Just need to let the rings seat and get some soft and steady miles on it.

_________________
Image


Top
 Profile  
Reply with quote  
 Post subject: An Agreement!
PostPosted: Fri Feb 02, 2007 9:27 pm 
Offline
Addicted to LUV
User avatar

Joined: Thu Sep 28, 2006 5:31 pm
Posts: 1075
Location: Covington, WA
That's great! Thank you BlackLuv for the agreement with me, and I will be doing the "putting the oil through with the coil wire removed" thing. After all the comments I'll probably pour some oil in the outlet hole of the pump as it's being installed, which is when the front cover goes on together with the pump.

Jackson Browne and the Eagles. I'll be playing both their CDs in the LUV when I get going.

What I have to do with the cam is take it all apart, and clean all the grit out. I left it at the machine shop and forgot to bring it back home for that. I need a ride in just for that now. Have to wait for Monday.

_________________
'78 1.8L 4-speed Fleetside
Image Image
The only thing more beautiful than a sunset is a sunrise.


Top
 Profile  
Reply with quote  
 Post subject:
PostPosted: Fri Feb 02, 2007 11:58 pm 
Offline
Addicted to LUV

Joined: Mon Aug 28, 2006 11:54 pm
Posts: 6584
Location: Pelahatchie, MS
After looking back through the previous posts on this thread, on page 9 there is a pic of the bearings. The amount of wear on the bearings leads me to believe this was clearance issue related. I also noticed a previous post that the oil sending unit was unplugged. If the clearance was out of spec, which i suspect after looking at the bearing surface wear in the pic, the low oil pressure couldn't be noticed as the indicator light was not operational.The plan to install a pressure gauge sounds like a plan.

_________________
If you think no one cares, try missing a couple of payments...


FIAA!

SFPP!


Top
 Profile  
Reply with quote  
 Post subject:
PostPosted: Sat Feb 03, 2007 8:13 am 
Offline
Addicted to LUV
User avatar

Joined: Thu Sep 28, 2006 5:31 pm
Posts: 1075
Location: Covington, WA
I believe what happened with the oil pressure sending unit is that I had accidentally disconnected it when I changed the oil filter. I shouldn't have changed the oil filter so soon, and shouldn't have done it in such a rush. It was dark outside and I only had the one trouble light to see by. My neighbor Jeff and his brother Adam had showed up and I had already finished draining the oil. I went in overdrive to hurry up and put the new oil in and the new filter, so they could listen to the engine purr.

I learned way back in fourth grade that haste makes waste, but we all know we're guilty of hurrying when we shouldn't. I wrote a saying when I went to college that just has stuck with me--To learn means to become aware, not to create immunity. So no matter how smart you are or how educated you get, you still can make mistakes. I am hoping I don't make any mistakes in assembling the engine this time around. I'm going to be fighting the impulse to throw it all together in a day and fly down the road, versus a careful, methodical, engine assembly. Maybe the Kodak will come into play here, and give me reason to pause and let y'all see what's going right.

I have been told that it will be ready for me in a week and a half. I also need to order the new bearings and gaskets.

_________________
'78 1.8L 4-speed Fleetside
Image Image
The only thing more beautiful than a sunset is a sunrise.


Last edited by FullaLuv on Sat Feb 03, 2007 9:40 am, edited 1 time in total.

Top
 Profile  
Reply with quote  
 Post subject:
PostPosted: Sat Feb 03, 2007 8:20 am 
Offline
Assimilated into LUVTruck.com
User avatar

Joined: Thu Sep 23, 2004 7:20 pm
Posts: 993
Location: Winston Salem, NC
Did you put any oil in the filter before putting it on? It should take about a 1/4 of a quart to fill it, or a bit more. If it's draining into the filter too slowly, take a paper clip and bend it so each end is sticking into the drain holes in the filter but on opposite ends, it will allow the air to escape from the other side of the filter so the oil will soak in faster. Little trick I learned when pre-filling the filters on the V8 northstars (to keep the cams and lifters from clackin' around) and the newer corvettes, I allways pre-filled the Z06 filters, vettes take a while to build up oil pressure, pre-filling them will have the guage were it's suppost to be in 1-2 seconds, while not will have it up in around 5-7...

_________________
-Old ride-82 Luv diesel 5spd with some upgrades
-Past rides-82 Sierra, 78 Coupe De'Ville, 91 2dr Blazer, 86 RX7, 86 Porsche 944T (rear-ended and totaled)
-Curr. rides- 1970 Ford LTD 4dr, 390 4Bbl, 2nd owner! With a few Extras ;) 00' Civic beater...


Top
 Profile  
Reply with quote  
 Post subject:
PostPosted: Sat Feb 03, 2007 8:24 am 
Offline
Addicted to LUV
User avatar

Joined: Wed Apr 12, 2006 2:24 pm
Posts: 2143
Location: Hermiston,Oregon
Fullaluv show me some body that hasn't made a mistake on a motor and i will show you some body that doesn't work on motors

_________________
1978 pro street step/side 455Buick, 4sp,4.11s, 31/18.5s


Top
 Profile  
Reply with quote  
 Post subject:
PostPosted: Sat Feb 03, 2007 8:39 am 
Offline
Addicted to LUV
User avatar

Joined: Thu Sep 28, 2006 5:31 pm
Posts: 1075
Location: Covington, WA
There was some discussion on the filter before, but this is my thought so far. The Fram oil filters are not good quality, and I'm going for a Purolator. I'm basing that decision on advice given by my neighbor Jeff. I plan to have him help me with the engine assembly, and he has told me that he read a consumer's report about a comparison test done with lots of different filters. Based on filtration and flow, the Fram filter was always the worse, while the Purolator was the best. Jeff said he proved it to himself when he changed a filter on his Ford pickup which used to take a minute and a half to quiet down after starting with a Fram filter, and then went to Purolator after reading the article. He said it was quiet immediately upon starting. I would venture to say the Fram "Tough Guard" oil filter that I used probably didn't help the situation in my failed engine either. It probably helped to impede the flow.

If I ask him again where the article was, I'll let y'all know.

I also want to say that if we were supposed to fill the oil filter before installing it, why wouldn't the filter manufacturer instruct us to do so? One thing I know is that air compresses, and fluid does not. If the filter is installed dry, the air might allow an easier initial fill and flow through than fluid such as oil, even though it's designed for oil flow. Having said that you might even say pre-filling an oil filter could prevent the flow! I doubt it though.

_________________
'78 1.8L 4-speed Fleetside
Image Image
The only thing more beautiful than a sunset is a sunrise.


Last edited by FullaLuv on Sat Feb 03, 2007 9:02 am, edited 1 time in total.

Top
 Profile  
Reply with quote  
 Post subject:
PostPosted: Sat Feb 03, 2007 8:41 am 
Offline
Addicted to LUV
User avatar

Joined: Thu Sep 28, 2006 5:31 pm
Posts: 1075
Location: Covington, WA
TJ, Beyonce? Bring her over when ya come. Lisa says it's okay.

_________________
'78 1.8L 4-speed Fleetside
Image Image
The only thing more beautiful than a sunset is a sunrise.


Top
 Profile  
Reply with quote  
 Post subject:
PostPosted: Sat Feb 03, 2007 2:16 pm 
Offline
Senior Member
User avatar

Joined: Fri Jan 12, 2007 8:43 pm
Posts: 74
tj white wrote:
Fullaluv show me some body that hasn't made a mistake on a motor and i will show you some body that doesn't work on motors


I'll second that.


Top
 Profile  
Reply with quote  
 Post subject:
PostPosted: Sat Feb 03, 2007 8:48 pm 
Offline
Addicted to LUV
User avatar

Joined: Thu Sep 28, 2006 5:31 pm
Posts: 1075
Location: Covington, WA
I cleaned up some parts today. The starter, the rear main oil seal retainer, and the top cover. I have photos of the oil jet from two engines: the one from my first engine that was damaged when I didn't have the timing chain tensioner adjuster set properly, and another off Taz's engine. The oil jet fastens through the lower bolt hole in the timing chain guide. I also compared timing chains from each engine, and found that by comparing side by side, the chain from Tazman has less wear. I will use it. The last photo is of the short block with the crankshaft and pistons still in, waiting to be removed.

Image Image

Image Image

Image Image

Image Image

_________________
'78 1.8L 4-speed Fleetside
Image Image
The only thing more beautiful than a sunset is a sunrise.


Top
 Profile  
Reply with quote  
 Post subject:
PostPosted: Sat Feb 03, 2007 11:22 pm 
Offline
Addicted to LUV
User avatar

Joined: Thu Sep 28, 2006 5:31 pm
Posts: 1075
Location: Covington, WA
If you've been following this thread that's good. If you haven't or just want to be level-oriented, read this carefully. The entire reason I'm having to rebuild this engine now can be traced back to the fact that I didn't understand how to leave the tensioner adjuster in the proper position. I ended up foolishly leaving it in a position that left the timing chain flopping around. It left several gouges in the parts around it, and the worse of these was the oil jet inside the front cover. (Note: this did not cause the oil starvation) I found my mistake when I discovered a missing adjuster bolt and went to recover the part out of the oil pan. Replacing a tensioner adjuster requires removal of the cylinder head and the oil pan, before removing the front cover. I discovered the damaged oil jet when I removed the front cover. You might as well do an entire engine rebuild if you're going to go this far, because by this time you've already stripped the engine down to a short block, only the pistons and crank are still intact. (I did go ahead to replace new rings and bearings only to have the work result in engine failure, which is why I'm doing the current overhaul) I got another engine so graciously given to me, and that has provided me the opportunity to compare various parts and make exchanges as needed. Now I want you readers to focus on this part, called the oil jet. In the first photo you see two of these. the oil jet on the left is damaged. This is the one I found when I first removed the front cover. The one on the right came from my second engine. If you have clicked on the photo and enlarged it, you should be able to see the two tiny holes in the collar around the bolt on the right. This collar's inside diameter is slightly larger than the bolt which fastens it to the oil galley as well as is the lower fastener for the timing chain guide. Oil under pump pressure is then sprayed onto the timing chain before it reaches the sprocket and after it leaves the sprocket assuredly so by the design of the seat in the collar, which has a flat side. When I first succeeded in getting my LUV running, if the good people at Pacific Auto Machine had not informed me of the noise my timing chain was making I would have gouged the bolt even further, and possibly had even worse consequences. Speculate all you want, I'm really fortunate to have a machine shop who cares enough to give me good advice and it made me check this out. That's why I found the damaged oil jet, as well as the broken adjuster. The subsequent failure of the engine is my own fault, and not about this oil jet. I wanted to share this relevant information about the oil routes in the G180, as well as inform the readers of the consequences of improper installation of the adjuster.

Image Image

Image

_________________
'78 1.8L 4-speed Fleetside
Image Image
The only thing more beautiful than a sunset is a sunrise.


Top
 Profile  
Reply with quote  
 Post subject:
PostPosted: Mon Feb 05, 2007 4:45 pm 
Offline
Addicted to LUV
User avatar

Joined: Thu Sep 28, 2006 5:31 pm
Posts: 1075
Location: Covington, WA
Image

Here is the shop where I'm having the work done on my block, pistons, and crankshaft, as well as the oil pump, front cover, oil pan, and valve cover. The latter are being cleaned, and the block and crankshaft have already been cleaned and magnafluxed. The block will be line bored, cylinders bored, and new pistons will go on the rods with chrome rings. The crankshaft is being ground and polished. I took in the three oil pumps, and they fixed me up with one good pump by swapping parts around. They also said the vaseline thing would work! However, they're going to loan me a oil pump to prime the oil galley, so my hats off to all you guys who said it must be done.

This shop has been in business since 1961, and the people working there really know their stuff. They're friendly and knowledgeable, and always take the time to answer any question I might have. They specialize in rebuilding older engines, so Chevy LUV owners, tell 'em John sent ya! I have no doubt they can handle anything you want done.

_________________
'78 1.8L 4-speed Fleetside
Image Image
The only thing more beautiful than a sunset is a sunrise.


Top
 Profile  
Reply with quote  
 Post subject:
PostPosted: Mon Feb 05, 2007 4:50 pm 
Offline
LUVTruck.com Guru
User avatar

Joined: Fri Nov 03, 2006 8:14 pm
Posts: 177
Location: Olympia, WA
Hey John,
Can the front crank seal be replaced without removing the timing cover?

Now that I have gotten Blue Luv #2 running it looks like I am leaking oil from the front seal.

thanks,
Dan

_________________
Did a v8 conversion in 1981 on my '76 luv
Current Fleet
#1 1980 Black 2wd, #2 1980 Blue 2wd, #3 1980 Black 4x4 #4 1980 black 2wd Long bed #5 1979 black 4x4 #6 1977 red 2WD
pics
http://s137.photobucket.com/albums/q223/gs11x/


Top
 Profile  
Reply with quote  
 Post subject:
PostPosted: Mon Feb 05, 2007 5:14 pm 
Offline
Addicted to LUV
User avatar

Joined: Thu Sep 28, 2006 5:31 pm
Posts: 1075
Location: Covington, WA
Dan, that's a good question. Tell you what I'm gonna do. I have a front cover that I removed from Tazman's engine. It's greasy, and grimy, but I don't care, I hadn't planned to use it. Why don't I go out and take a video of myself trying to remove that seal, and see if I can do it? I'll set up the camera, and we'll get this video here for ya within the half hour if it all goes well. When I took the engine apart, I removed the seal by tapping on the back of it through the opening. Let's see about removing it from the front cover after the harmonic balancer is taken off the shaft!

Image Image

_________________
'78 1.8L 4-speed Fleetside
Image Image
The only thing more beautiful than a sunset is a sunrise.


Last edited by FullaLuv on Mon Feb 05, 2007 5:52 pm, edited 1 time in total.

Top
 Profile  
Reply with quote  
 Post subject:
PostPosted: Mon Feb 05, 2007 5:48 pm 
Offline
Addicted to LUV
User avatar

Joined: Thu Sep 28, 2006 5:31 pm
Posts: 1075
Location: Covington, WA
The answer is most definitely, yes. I would use caution to not damage any of the aluminum around the seal by trying another spot on the seal if it doesn't come off as easy as it did for me. When you replace it, use a large enough drive such as a large socket, or the right installation tool. It's tool #J-26587. My manual has a picture of it being installed, so there is your answer.


Image Image

_________________
'78 1.8L 4-speed Fleetside
Image Image
The only thing more beautiful than a sunset is a sunrise.


Last edited by FullaLuv on Mon Feb 05, 2007 6:20 pm, edited 5 times in total.

Top
 Profile  
Reply with quote  
 Post subject:
PostPosted: Mon Feb 05, 2007 6:02 pm 
Offline
LUVTruck.com Guru
User avatar

Joined: Fri Nov 03, 2006 8:14 pm
Posts: 177
Location: Olympia, WA
Wow John,
thanks for the video. Looks like an easy fix for my blue Luv's oil leak
Now just have to find the part.
thanks,
Dan

_________________
Did a v8 conversion in 1981 on my '76 luv
Current Fleet
#1 1980 Black 2wd, #2 1980 Blue 2wd, #3 1980 Black 4x4 #4 1980 black 2wd Long bed #5 1979 black 4x4 #6 1977 red 2WD
pics
http://s137.photobucket.com/albums/q223/gs11x/


Top
 Profile  
Reply with quote  
 Post subject:
PostPosted: Mon Feb 05, 2007 6:11 pm 
Offline
Addicted to LUV
User avatar

Joined: Thu Sep 28, 2006 5:31 pm
Posts: 1075
Location: Covington, WA
Ha ha ha. LOL Made my Day. Do yourself a good job!!!

Here's the seal!

http://www.partsamerica.com/ProductDeta ... 26&ptset=A

_________________
'78 1.8L 4-speed Fleetside
Image Image
The only thing more beautiful than a sunset is a sunrise.


Top
 Profile  
Reply with quote  
 Post subject:
PostPosted: Tue Feb 06, 2007 1:16 am 
Offline
Addicted to LUV
User avatar

Joined: Thu Sep 28, 2006 5:31 pm
Posts: 1075
Location: Covington, WA
Larry took me to the machine shop again today, and I brought my cylinder head back. I need to take the rocker shafts apart and return the shafts alone for hot tanking. The reassembly will be all mine.

Here's a few photos.

Image Image
The head as it came from the shop

Image Image
Taking the rocker arm brackets apart

Image Image
I also cleaned the harmonic balancer (Notice the white enamel on the timing mark!)

Image Image
Rocker arms were numbered with a Sharpie®

Image Image
The rocker arm shafts ready to go and the camshaft

_________________
'78 1.8L 4-speed Fleetside
Image Image
The only thing more beautiful than a sunset is a sunrise.


Top
 Profile  
Reply with quote  
 Post subject:
PostPosted: Tue Feb 06, 2007 3:59 pm 
Offline
Senior Member
User avatar

Joined: Fri Jan 12, 2007 8:43 pm
Posts: 74
Glad to see you are back at it and coming along just fine. Are you going to replace those valve stem seals while you have the head off? Now would be the time to do it. With boring the block and those new rings there will be a lot of suction on those seals. You can also hand lap those valve seats to make sure you have a good seal if you are not going to grind the valves. Just a tip.

Thanks for reminding me how that seal goes in that front cover. I am going to have to replace mine and i could not remember if that seal went in from the front or the back of the cover. On some engines it goes in from the back and it has been a long time since i built mine and i could not remember. Thanks to gs11x's ? and your answer i have been enlightened. Thanks again and good luck.


Top
 Profile  
Reply with quote  
Display posts from previous:  Sort by  
Post new topic Reply to topic  [ 523 posts ]  Go to page Previous  1 ... 19, 20, 21, 22, 23, 24, 25 ... 27  Next

All times are UTC - 6 hours


Who is online

Users browsing this forum: Google [Bot] and 22 guests


You cannot post new topics in this forum
You cannot reply to topics in this forum
You cannot edit your posts in this forum
You cannot delete your posts in this forum
You cannot post attachments in this forum

Search for:
Jump to:  
Powered by phpBB® Forum Software © phpBB Group