LUVTruck.com

phpBBV3 Message Board
It is currently Thu Jul 03, 2025 2:55 pm

All times are UTC - 6 hours


Post new topic Reply to topic  [ 12 posts ] 
Author Message
 Post subject: Oil Pan Removal
PostPosted: Sun May 06, 2007 11:08 pm 
Offline
LUVTruck.com Guru
User avatar

Joined: Fri Nov 03, 2006 8:14 pm
Posts: 177
Location: Olympia, WA
sorry for the dumb question but....

Can you remove the oil pan with out removing the engine?

I thought you could. I heard guys reverence it on the forum. I have everything undone but now it looks like I have to remove the main tie rod to get it out. Do I really have to disconnect the tie rod? thought I would ask before I did something I regretted. :oops:

_________________
Did a v8 conversion in 1981 on my '76 luv
Current Fleet
#1 1980 Black 2wd, #2 1980 Blue 2wd, #3 1980 Black 4x4 #4 1980 black 2wd Long bed #5 1979 black 4x4 #6 1977 red 2WD
pics
http://s137.photobucket.com/albums/q223/gs11x/


Top
 Profile  
Reply with quote  
 Post subject:
PostPosted: Mon May 07, 2007 5:19 am 
Offline
PITA Old Fart

Joined: Thu May 22, 2003 8:33 am
Posts: 2286
You are most likely going to have to unbolt the engine mounts and raise up the engine to get enough clearance to get it off.


Top
 Profile  
Reply with quote  
PostPosted: Mon May 07, 2007 6:29 am 
Offline
Addicted to LUV
User avatar

Joined: Thu Sep 28, 2006 5:31 pm
Posts: 1075
Location: Covington, WA
If you don't want to raise the engine, and want the oil pan removed you have to remove the crossmember and the midlink, yes. Just back off on the locknuts a turn and stop so you can replace it when you're done without affecting the alignment. Be aware that they have opposite-hand threads...that is, the midlink attaches to both tie rods at the same time.

I would say the right side has right-hand threads, and the left side has left-hand threads. I used a 15-inch adjustable wrench to hold the midlink while I released the lock nuts.

Replacing the oil pan under the vehicle is not fun. You will also need to remove both of the braces on the rear of the block, one of which has the clutch cable going through it. I don't have an automatic, so I can't say what it looks like. Be sure you don't over-tighten the bolts on the pan and make the new gasket get damaged. My oil pan gasket said not to use any chemicals, but I had to use Permatex® to make it stay in place. I put it on the block first.

When I had the engine in the shop on a stand, it was a lot better. Especially since I forgot to include the oil pickup tube, and immediately had to do it over!!!

PS- That wasn't a dumb question; the manual describes it.

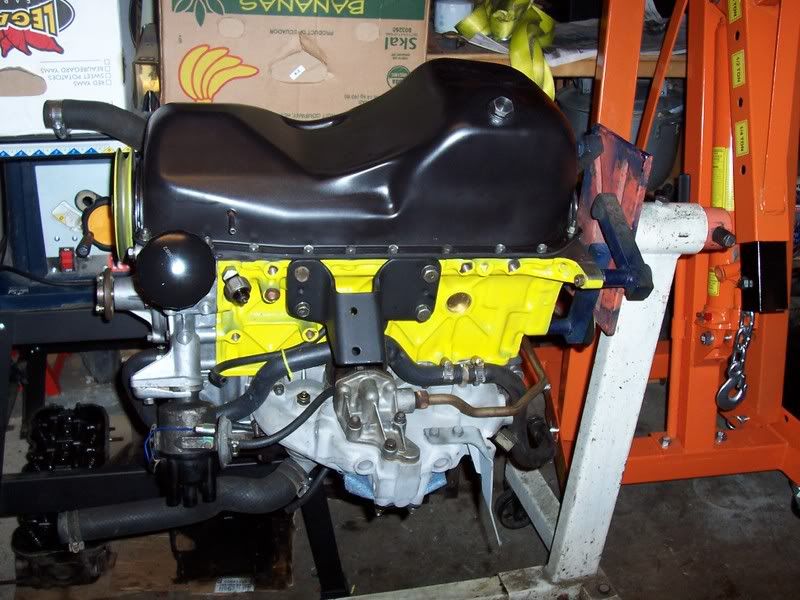
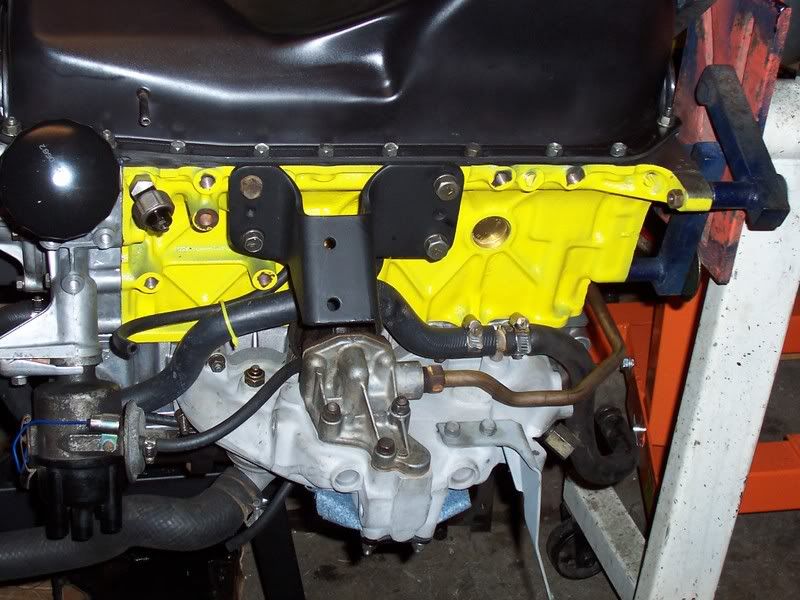
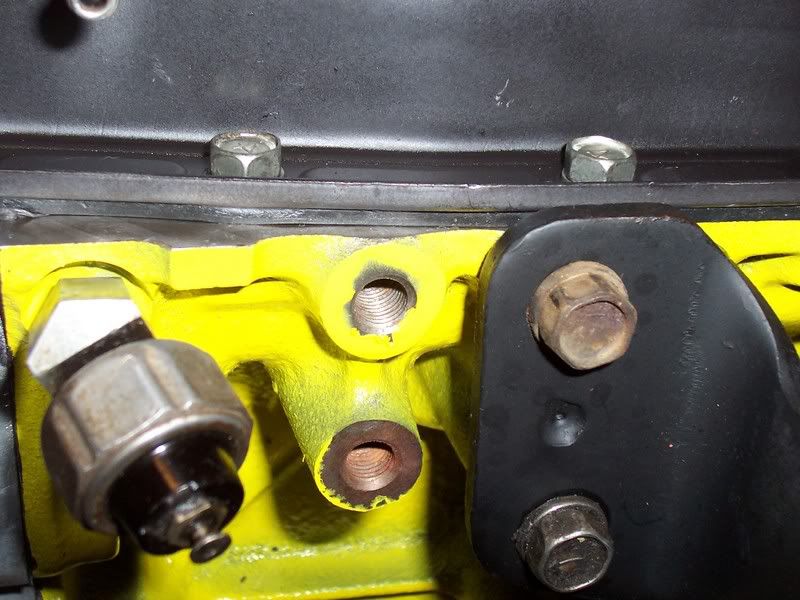
Here's a few views...

Image Image
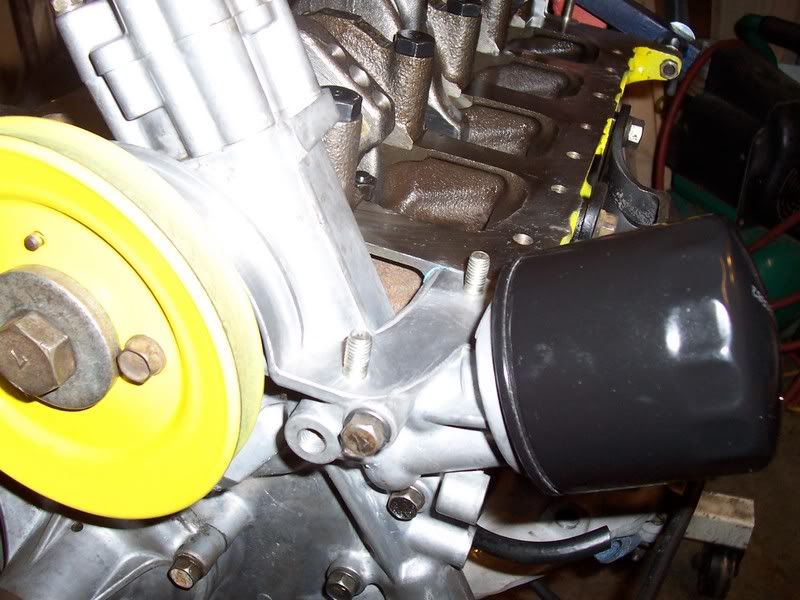
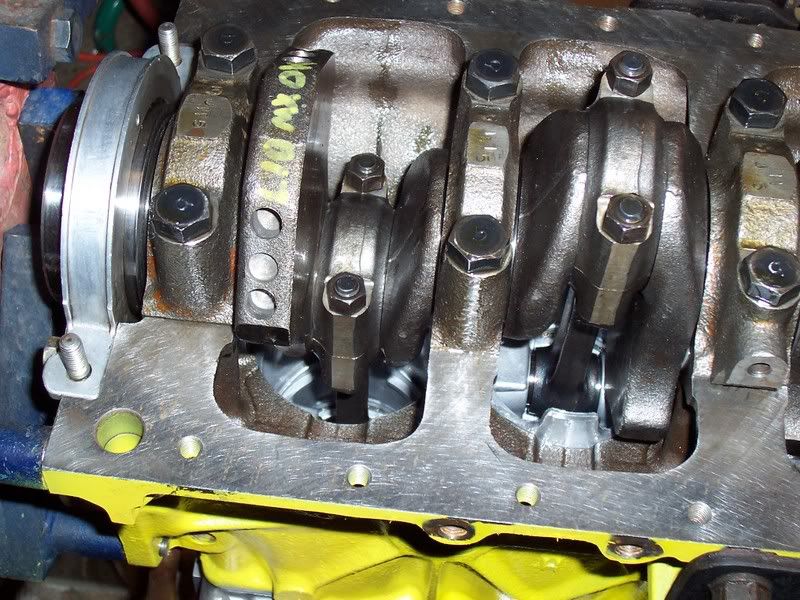
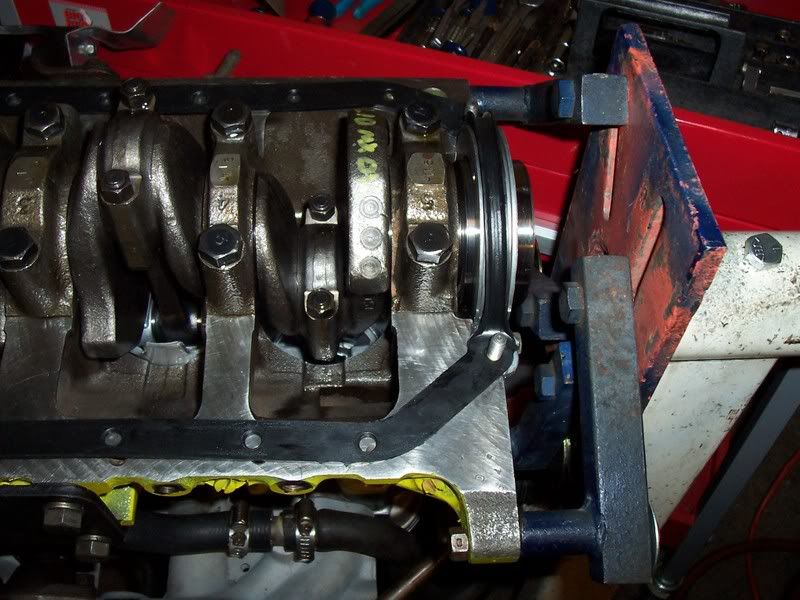
The front; remember to apply sealant at the points where the steel block meets the aluminum brackets/The rear

Image Image
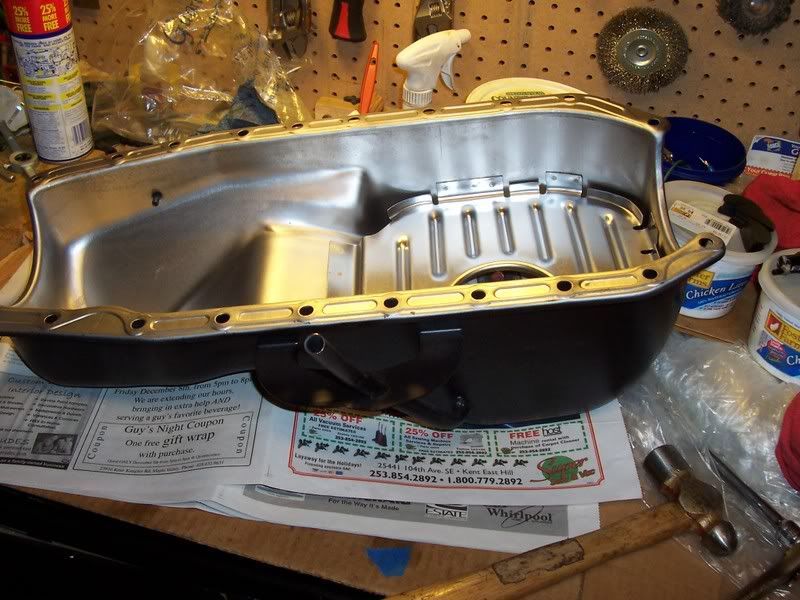
The oil pan/Herein lies the problem; see how the gasket doesn't line up perfectly with the holes?

Image Image
That's why I had to use Permatex®, because the rubber gasket wouldn't stay where I wanted it

Image Image
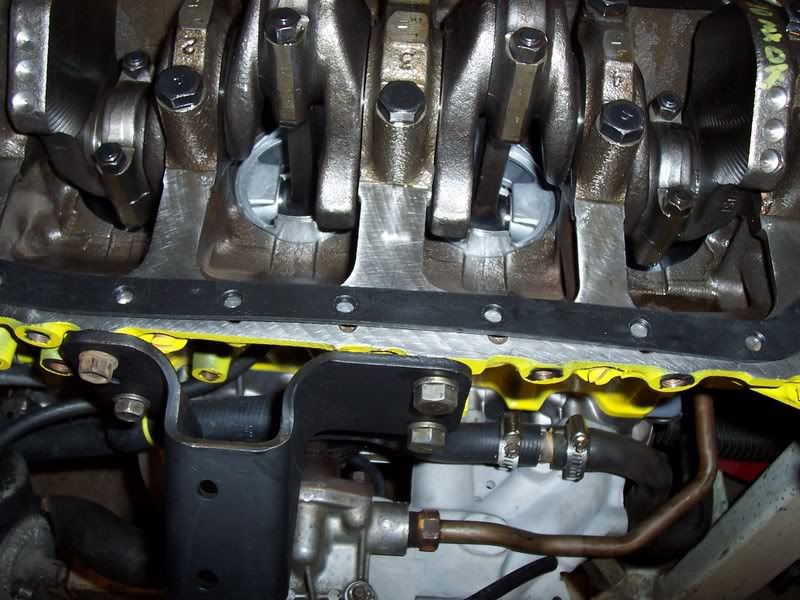
Much easier upside down on an engine stand!!!/Notice the even line of the gasket

Image Image
No protrusions, or bulging

_________________
'78 1.8L 4-speed Fleetside
Image Image
The only thing more beautiful than a sunset is a sunrise.


Top
 Profile  
Reply with quote  
 Post subject:
PostPosted: Mon May 07, 2007 7:26 am 
Offline
Addicted to LUV
User avatar

Joined: Wed Apr 12, 2006 2:24 pm
Posts: 2143
Location: Hermiston,Oregon
Very good photo record of the pan job Fullaluv keep up the good work.

_________________
1978 pro street step/side 455Buick, 4sp,4.11s, 31/18.5s


Top
 Profile  
Reply with quote  
 Post subject:
PostPosted: Mon May 07, 2007 7:36 am 
Offline
Addicted to LUV
User avatar

Joined: Thu Sep 28, 2006 5:31 pm
Posts: 1075
Location: Covington, WA
Thanks TJ, and I hope it gives Gs11x a boost, as well as anyone else who looks. I have taken over 2000 photos of my LUV since I got it in September. I find myself using them over and over too!

_________________
'78 1.8L 4-speed Fleetside
Image Image
The only thing more beautiful than a sunset is a sunrise.


Top
 Profile  
Reply with quote  
 Post subject:
PostPosted: Mon May 07, 2007 11:03 am 
Offline
LUVTruck.com Guru
User avatar

Joined: Fri Nov 03, 2006 8:14 pm
Posts: 177
Location: Olympia, WA
Thanks Fellow Washington luvers. These guys are up at 3 and 4am in the morning to give me help. you can't buy this kind of support.

I guess I should read the manual before I posted. It was right there in the manual to disconnect the steering link to remove the pan for 2wd.
4wd you have to pull the engine.

Looks like someone did overtighten the pan because the gasket was split around one of the bolt holes. the pan is also bulged around many of the bolt holes. I think i will try to flatten some of them a little with my body hammer.

_________________
Did a v8 conversion in 1981 on my '76 luv
Current Fleet
#1 1980 Black 2wd, #2 1980 Blue 2wd, #3 1980 Black 4x4 #4 1980 black 2wd Long bed #5 1979 black 4x4 #6 1977 red 2WD
pics
http://s137.photobucket.com/albums/q223/gs11x/


Top
 Profile  
Reply with quote  
 Post subject:
PostPosted: Mon May 07, 2007 12:31 pm 
Offline
Addicted to LUV
User avatar

Joined: Thu Sep 28, 2006 5:31 pm
Posts: 1075
Location: Covington, WA
Yes, do tap them down a tiny bit, with a soft base like a furniture pad under the pan.

_________________
'78 1.8L 4-speed Fleetside
Image Image
The only thing more beautiful than a sunset is a sunrise.


Top
 Profile  
Reply with quote  
 Post subject:
PostPosted: Mon May 07, 2007 1:57 pm 
Offline
PITA Old Fart

Joined: Thu May 22, 2003 8:33 am
Posts: 2286
The holes in most gaskets are designed to be small enough so that you can screw the bolts through them by hand and they will stay put holding the gasket in place while you install it all.

Another great trick to hold the gasket in place is to use sewing thread to tie the gasket to the pan.

Using permatex is like shooting yourself in the foot. If you have ever had to fight like hell to get a part off just to sit and scrape permatex off forever before you can put it back on, then you would know what I mean. That crap should be illegal.


Top
 Profile  
Reply with quote  
 Post subject: Bullet vs. scraping
PostPosted: Mon May 07, 2007 4:11 pm 
Offline
Addicted to LUV
User avatar

Joined: Thu Sep 28, 2006 5:31 pm
Posts: 1075
Location: Covington, WA
I'd rather scrape off Permatex than pull a bullet out of my foot. I like your thread suggestion. That's a winner, and I wish I'd known that. When I put the engine together in my shop I didn't use any Permatex on the rubber gasket except where the manual instructs us to, at the junctures of steel and aluminum.

Underneath the vehicle, I couldn't think of any other way, but your thread trick is a winner. Also, I didn't think to use the gasket's seeming malformation to hold the bolts. That would've been good too.

_________________
'78 1.8L 4-speed Fleetside
Image Image
The only thing more beautiful than a sunset is a sunrise.


Top
 Profile  
Reply with quote  
 Post subject:
PostPosted: Tue May 08, 2007 1:55 am 
Offline
LUVTruck.com Lifer

Joined: Sun May 15, 2005 4:57 pm
Posts: 680
Location: Cornelius Ore
Another trick I did was have a few extra pan bolts with the heads cut off. Screw them in to hold the gasket in place, put the pan in place, then remove them and put in the regular bolts. And you are right-do not over tighten them.


Top
 Profile  
Reply with quote  
 Post subject:
PostPosted: Mon May 14, 2007 10:39 pm 
Offline
Assimilated into LUVTruck.com
User avatar

Joined: Mon Mar 19, 2007 9:22 pm
Posts: 885
Location: Coburg, OR
I'm curious how this 'thread trick' works? Care to explain a bit more Taz?

_________________
"If we did the things we are capable of, we would astound ourselves" - Thomas Edison


Top
 Profile  
Reply with quote  
 Post subject:
PostPosted: Tue May 15, 2007 3:08 am 
Offline
PITA Old Fart

Joined: Thu May 22, 2003 8:33 am
Posts: 2286
Take plain old cotton sewing thread and use it to tie the gasket to the pan through the bolt holes to hold the gasket in place while you are putting it and the pan back on. The thread won't cause any leakage and doesn't cause any problems if you just leave it there, or it can be cut and removed by pulling it out once you get all of your bolts started.

Also, for some odd reason, most G180's have studs sticking through in the bottom of the timing cover where it bolts to the oil pan. If you double nut them and lock the two nuts together, you can remove them to make it a lot easier to get the pan on and off. You can put them back in when you re-install the pan or just replace them with bolts like I did.

That way, if you ever have to replace your timing cover gasket, it makes the whole process a lot easier, since those pesky studs sticking through the oil pan make it darn near impossible to get the timing cover off with the oil pan still bolted on.

I mean, good grief, it's bad enough that you have to replace the head gasket every time you take the timing cover off, since the clever folks at Isuzu decided in their infinite wisdom to design an engine with two bolts through the head and head gasket into the top of the timing cover.

But studs through the front of the oil pan too?

That's pure engineering genius at work right there...lol


Top
 Profile  
Reply with quote  
Display posts from previous:  Sort by  
Post new topic Reply to topic  [ 12 posts ] 

All times are UTC - 6 hours


Who is online

Users browsing this forum: No registered users and 10 guests


You cannot post new topics in this forum
You cannot reply to topics in this forum
You cannot edit your posts in this forum
You cannot delete your posts in this forum
You cannot post attachments in this forum

Search for:
Jump to:  
Powered by phpBB® Forum Software © phpBB Group