LUVTruck.com

phpBBV3 Message Board
It is currently Thu May 23, 2024 12:36 am

All times are UTC - 6 hours


Post new topic Reply to topic  [ 558 posts ]  Go to page Previous  1 ... 15, 16, 17, 18, 19, 20, 21 ... 28  Next
Author Message
PostPosted: Sat Feb 22, 2014 11:43 pm 
Offline
Addicted to LUV
User avatar

Joined: Thu Jan 21, 2010 11:47 pm
Posts: 2944
Location: Vancouver, Washington
Todays progress
New clutch kit
Image

Image

Radiator hose is just there to hold the radiator up
Image
Got stainless allen head fasteners for the intake manifold and a swiveling tstat housing with the same hardware
Image

Its bolted in and there to stay this time, air intake was just put on to see where it would go and it came out right where i had hoped and clears the hood just fine. Need to do a lot of wiring and misc odds and ends before its done but this was a big step down. Working on radiator mount tomorrow and going to get started with the wiring and fuel line hookup

_________________
Luvless :(
1980 Mikado-Sold.

1993 Lexus SC400 my Daily
2004 Yamaha WR250F my new love in life
2016 Toyota Camry my girls ride


Last edited by love4theluv on Sun Feb 23, 2014 12:08 am, edited 1 time in total.

Top
 Profile  
Reply with quote  
PostPosted: Sat Feb 22, 2014 11:59 pm 
Offline
lives at LUVTruck.com

Joined: Fri Dec 14, 2012 12:25 am
Posts: 347
Location: Washington State
Almost makes me wish I went with a v6! Looks like it belongs there. Looking good!

_________________
I'm workin' on it
78 chassis with 75 cab
SBC


Top
 Profile  
Reply with quote  
PostPosted: Sun Feb 23, 2014 12:07 am 
Offline
Addicted to LUV
User avatar

Joined: Thu Jan 21, 2010 11:47 pm
Posts: 2944
Location: Vancouver, Washington
Thanks dude. I love the way it fits in there, can get to the bellhousing bolts and there should be radiator clearance. Not a lot but some 8)
Any of you guys run a up22 fiberglass front bumper? Have been wanting ome to save some weight off the front, maybe a hood later this year. Trying to get any extra weight off the front end.
Thinking bout ditching the fairly small stock tank and putting one where the spare tire was to get the weight way back and centered

_________________
Luvless :(
1980 Mikado-Sold.

1993 Lexus SC400 my Daily
2004 Yamaha WR250F my new love in life
2016 Toyota Camry my girls ride


Top
 Profile  
Reply with quote  
PostPosted: Sun Feb 23, 2014 9:53 pm 
Offline
Addicted to LUV
User avatar

Joined: Thu Jan 21, 2010 11:47 pm
Posts: 2944
Location: Vancouver, Washington
Got some stuff squared away today and started the next steps
Got the motor mounts torqued, trans mount tqd, headers on, tstat housing rtv'd and tqd, throttle linkage figured out, water punp is on, balancer and pulley are on, put white paint in the groove on the balancer to make timing easier
Image


Image

Headers are on starter is in, can pop the distributor right in and out
Image

Started modifying the driver side middle header tube to clear the steering shaft, going to be cutting material off the head side and rerouting this tube the inner side of the steering shaft. There will be room for the spark plug but not a whole lot glad i got iridium cuz changing it will be annoying
Image

_________________
Luvless :(
1980 Mikado-Sold.

1993 Lexus SC400 my Daily
2004 Yamaha WR250F my new love in life
2016 Toyota Camry my girls ride


Top
 Profile  
Reply with quote  
PostPosted: Tue Feb 25, 2014 12:02 pm 
Offline
Senior Member

Joined: Sun Jul 07, 2013 6:46 pm
Posts: 80
Location: Castaic, Ca
love4theluv wrote:
Got the right t/o bearing tstat housing and ujoint today, have the weekend off and so does my dad so lots happening this weekend we are hoping to...
*get the engine dropped in and mated up with the tranny
*get the intake manifold bolted down and carb bolted up
*modify the driver side header middle tube to clear the steering shaft already got the tubing piece i needed
*measure the new driveline length and get it to the shop
*work on getting the radiator mounts designed and installed.

Still a ton of work to do but i have the majority of the stuff i was missing so its pretty much down to the assembly.


Out of curiosity how long was your shaft from tranny housing to the diff? Are you running the stock rear? How are you adapting the shaft from the nv3500 to the stock rear?

_________________
Fortune favors the well prepared!


Top
 Profile  
Reply with quote  
PostPosted: Tue Feb 25, 2014 12:25 pm 
Offline
Addicted to LUV
User avatar

Joined: Thu Jan 21, 2010 11:47 pm
Posts: 2944
Location: Vancouver, Washington
I took the front piece of the s10 shaft when i pulled the tranny, was the two piece shaft wo i just took the front one. They have a 1/16" bigger ujoint too :ebiggrin so im having the shop pretty much graft the two together and rebalance it. Need to find where i wrote down length will do asap
Stock rear for now will be going to a explorer 8.8 when i have the money saved. Thought about s10 8.5 but i hear the expkorer lsd is better and the 8.8 is really beefy. Big axles big disc brakes and a drum ebrake i can abuse qithout hurting my braking ability

_________________
Luvless :(
1980 Mikado-Sold.

1993 Lexus SC400 my Daily
2004 Yamaha WR250F my new love in life
2016 Toyota Camry my girls ride


Top
 Profile  
Reply with quote  
PostPosted: Tue Feb 25, 2014 12:47 pm 
Offline
Senior Member

Joined: Sun Jul 07, 2013 6:46 pm
Posts: 80
Location: Castaic, Ca
love4theluv wrote:
I took the front piece of the s10 shaft when i pulled the tranny, was the two piece shaft wo i just took the front one. They have a 1/16" bigger ujoint too :ebiggrin so im having the shop pretty much graft the two together and rebalance it. Need to find where i wrote down length will do asap
Stock rear for now will be going to a explorer 8.8 when i have the money saved. Thought about s10 8.5 but i hear the expkorer lsd is better and the 8.8 is really beefy. Big axles big disc brakes and a drum ebrake i can abuse qithout hurting my braking ability


Cool. I am adapting the nv3500 out of a full-size to the stock rear. Same as you but I want to upgrade to a ford nine. They are a lot easier to change gear ratios and build. My driveshaft is 51.5" from tail housing to flange adapter. In order to adapt a larger joint I went to a ford nine flange with 1310 joints and I am having an adapter machined to fit the two together. This way when I swap out the rear after destroying it I can still use the same driveshaft. If you want I can send over a pic of the prototype and you can adapt yours for the 8.8. I am pretty sure if you use an explore rear it's the same flange i am using so the adapter should work for you as well. Since the nine and 8.8 are larger than the 10 bolt isuzu the 1" used for the adapter should be just right to mate up to the new rear without having to cut or add to the shaft. Like I always say fortune favors the well prepared!!

_________________
Fortune favors the well prepared!


Top
 Profile  
Reply with quote  
PostPosted: Tue Feb 25, 2014 12:55 pm 
Offline
Addicted to LUV
User avatar

Joined: Thu Jan 21, 2010 11:47 pm
Posts: 2944
Location: Vancouver, Washington
Yeah i would like to see it! I dont feel like i have the power to scratch a 8.8 so i shuldnt need anything bigger and heavier. biggest seller on 8.8 vs 8.5 was the 11" disc brakes vs drums on 8.5
One of these days i will end up with a blower either a m90 or m112 eaton gonna br a good year or two for that one! And even then i think the 8.8 will holdout just fine will need to rebuild the lsd clutches at that point for sure

_________________
Luvless :(
1980 Mikado-Sold.

1993 Lexus SC400 my Daily
2004 Yamaha WR250F my new love in life
2016 Toyota Camry my girls ride


Top
 Profile  
Reply with quote  
PostPosted: Tue Feb 25, 2014 1:09 pm 
Offline
Senior Member

Joined: Sun Jul 07, 2013 6:46 pm
Posts: 80
Location: Castaic, Ca
love4theluv wrote:
Yeah i would like to see it! I dont feel like i have the power to scratch a 8.8 so i shuldnt need anything bigger and heavier. biggest seller on 8.8 vs 8.5 was the 11" disc brakes vs drums on 8.5
One of these days i will end up with a blower either a m90 or m112 eaton gonna br a good year or two for that one! And even then i think the 8.8 will holdout just fine will need to rebuild the lsd clutches at that point for sure


Your crank will give out before the rear does! :lol: :lol: :lol: :lol: They have a cool 4.3 blown lurking aroung the net. Makes like 450 but I bet you could turn it up to about 600. It's got the lil brodie heads and a scat crank. Expensive as hell though. Looks friction awesome though!

_________________
Fortune favors the well prepared!


Top
 Profile  
Reply with quote  
PostPosted: Tue Feb 25, 2014 1:55 pm 
Offline
Addicted to LUV
User avatar

Joined: Thu Jan 21, 2010 11:47 pm
Posts: 2944
Location: Vancouver, Washington
Heck yeah man! I figure 8-10psi with water/meth injection after about 6lb with my vortec heads would make great torque. Syclones and typhoons used the old swirl port heads and ran 14.7psi on a small turbo and made about 330hp and redlines af 4250! i figure better hwads and a little less boost i can probably get close to that plus i can wind up to 5000-5500 (cam and intake ratings)

_________________
Luvless :(
1980 Mikado-Sold.

1993 Lexus SC400 my Daily
2004 Yamaha WR250F my new love in life
2016 Toyota Camry my girls ride


Top
 Profile  
Reply with quote  
PostPosted: Wed Feb 26, 2014 3:56 pm 
Offline
Addicted to LUV
User avatar

Joined: Thu Jan 21, 2010 11:47 pm
Posts: 2944
Location: Vancouver, Washington
alright heading to picknpull in the morning for an alternator, alt bracket with tensioner, water pump pulley and hopefully I can dig up a ribbed pulley to use as an idler on the driver side head, to get some more belt wrap around the water pump. will see what I can dig up tomorrow.

would like to find an oe shift knob for the nv3500 as well, I have the shift knob from my tcase on it now :lol:

_________________
Luvless :(
1980 Mikado-Sold.

1993 Lexus SC400 my Daily
2004 Yamaha WR250F my new love in life
2016 Toyota Camry my girls ride


Top
 Profile  
Reply with quote  
PostPosted: Fri Feb 28, 2014 5:17 pm 
Offline
Senior Member

Joined: Sun Jul 07, 2013 6:46 pm
Posts: 80
Location: Castaic, Ca
love4theluv wrote:
alright heading to picknpull in the morning for an alternator, alt bracket with tensioner, water pump pulley and hopefully I can dig up a ribbed pulley to use as an idler on the driver side head, to get some more belt wrap around the water pump. will see what I can dig up tomorrow.

would like to find an oe shift knob for the nv3500 as well, I have the shift knob from my tcase on it now :lol:


The nv3500 I got has a whole shift handle attached to the knob. They are pretty easy to modify though. If you need to put a bend in it use a 1" emt conduit bender and 2x4 on its side. The "stick" is made of rubber over steel tubing. About 5/8" in size but the rubber covering is thick. I think you mentioned your shifter is clear through all the gears so you won't have to cut the actual shifter too. What I was going to do is cut the stick down and weld on a thread that will work for a verity of shifters and try and save as much off the rubber portion to cover up knob connections. Cutting the original stick will help shorten the throw as well. BTW I have an extra crank pulley if you want it. I think its about 10 to ship. If you want to send me a shipping label you can have it.

_________________
Fortune favors the well prepared!


Top
 Profile  
Reply with quote  
PostPosted: Fri Feb 28, 2014 11:47 pm 
Offline
Addicted to LUV
User avatar

Joined: Thu Jan 21, 2010 11:47 pm
Posts: 2944
Location: Vancouver, Washington
Weird maybe the fullsize and s10 are different mine was threaded and took the shift knob off a s10 t5 like it belonged there. I had my old 4wd shifter knob on it before just to have a knob on it both threaded on fine

_________________
Luvless :(
1980 Mikado-Sold.

1993 Lexus SC400 my Daily
2004 Yamaha WR250F my new love in life
2016 Toyota Camry my girls ride


Top
 Profile  
Reply with quote  
PostPosted: Tue Mar 04, 2014 6:58 pm 
Offline
Addicted to LUV
User avatar

Joined: Thu Jan 21, 2010 11:47 pm
Posts: 2944
Location: Vancouver, Washington
Found the water pump pulley i needed in a blazer and got it installed today and got my shielding gas refilled. Time to mount the radiator and finish up the wiring and get it loomed up

_________________
Luvless :(
1980 Mikado-Sold.

1993 Lexus SC400 my Daily
2004 Yamaha WR250F my new love in life
2016 Toyota Camry my girls ride


Top
 Profile  
Reply with quote  
PostPosted: Wed Mar 05, 2014 1:46 am 
Offline
Addicted to LUV
User avatar

Joined: Thu Jan 21, 2010 11:47 pm
Posts: 2944
Location: Vancouver, Washington
Gotta make a run to picknpull tomorrow. Going to try taking the pulley off a tensioner since its groove and make a brwcket to mount in on off of the driver side head to everything goes where it needs to for the serp system to work right radiator mounts figured out working on trimming down the filler piece for the sides of the radiator. Flipped the electric fan blade around so i can put it as a pusher on the front
Will have pics up soon

_________________
Luvless :(
1980 Mikado-Sold.

1993 Lexus SC400 my Daily
2004 Yamaha WR250F my new love in life
2016 Toyota Camry my girls ride


Top
 Profile  
Reply with quote  
PostPosted: Thu Mar 06, 2014 12:08 am 
Offline
Addicted to LUV
User avatar

Joined: Thu Jan 21, 2010 11:47 pm
Posts: 2944
Location: Vancouver, Washington
Quick update not a lot happening. Planned out my idler on my driver side head
Going to take the ribbed pulley off of a belt tensioner and mount it on a plate on the driver side head to get the belt where it needs to go to make everything function as designed

Image

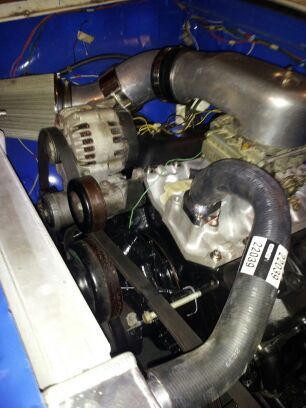
Have most of it lined up just need the idler
Image

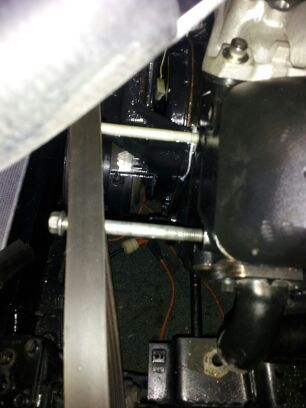
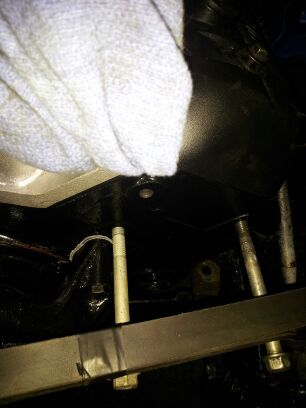
Going to use 3 pieces of pipe probably around 1/2" dia on each of the mount bolt holes here. Run them out and weld them to the back of a plate with holes for three mount bolts down the tubes to make a good trangulated mount. then mount the pulley to the plate, Going to see what belt lengths are available so i can figure out exactly where the pulley will need to mount. Ideally as low and far in as i can manage. Hoping since gm used that 6 rib on so many things i can find one short enough to route it closer to timing cover.
Image

When i get my idler pulley setup made i will pull the bracket back off and paint it and the one im making with the hitemp black so it will blend a bit more. I hate the look of the alt/tensioner bracket.
Image

Once i get the radiator mounted and run my heater lines i can start adding fluids. I picked up the remote oil filer mount out of a blazer at the yard, already had adapter and lines just need to pick a mounting spot on my fender well.
Found the boxto mount my battery in will get a pic of that next time im over there
Working on my placement for the clutch master cyl. It comes out at a downward angle into the engine compartment so trying to work out where it needs to sit and make the attachment point on my pedal.
Lots todo trying to get it back on the road asap good weather comin before long

_________________
Luvless :(
1980 Mikado-Sold.

1993 Lexus SC400 my Daily
2004 Yamaha WR250F my new love in life
2016 Toyota Camry my girls ride


Top
 Profile  
Reply with quote  
PostPosted: Fri Mar 07, 2014 5:56 pm 
Offline
Addicted to LUV
User avatar

Joined: Thu Jan 21, 2010 11:47 pm
Posts: 2944
Location: Vancouver, Washington
Got down to picknpull and grabbed the pulley off of a tensioner in a blazer this morning,
Also ran to vatozone and grabbed the belt, i measured the length with a measuring tape and got the pulley where i wanted it.
Gonna end up right about here. Will be 1/2-3/4" away from the bolts on the mounting plate, wanted it to stay close to the other pulleys to keep it as clean looking as i can. The stock bracket is too big on the driver side

Image

Will be after this again tomorrow and sunday. Bedliner in cab floor, painting big@$$ aluminum bracket and making my idler bracket tomorrow. Working on mounting my jeep power center and wiring it up to the ign switch so i can fire this bad boy up
Painted my oil filter bracket and adapter already, working on mounting the bracket and running the hoses. Will be able to add my oil once i get it setup and run my modded distributor oil pump primer. Gettin there slowly. Should be lookin good by monday :ebiggrin

_________________
Luvless :(
1980 Mikado-Sold.

1993 Lexus SC400 my Daily
2004 Yamaha WR250F my new love in life
2016 Toyota Camry my girls ride


Top
 Profile  
Reply with quote  
PostPosted: Fri Mar 07, 2014 6:04 pm 
Offline
Senior Member

Joined: Sun Jul 07, 2013 6:46 pm
Posts: 80
Location: Castaic, Ca
love4theluv wrote:
Got down to picknpull and grabbed the pulley off of a tensioner in a blazer this morning,
Also ran to vatozone and grabbed the belt, i measured the length with a measuring tape and got the pulley where i wanted it.
Gonna end up right about here. Will be 1/2-3/4" away from the bolts on the mounting plate, wanted it to stay close to the other pulleys to keep it as clean looking as i can. The stock bracket is too big on the driver side

Image

Will be after this again tomorrow and sunday. Bedliner in cab floor, painting big@$$ aluminum bracket and making my idler bracket tomorrow. Working on mounting my jeep power center and wiring it up to the ign switch so i can fire this bad boy up
Painted my oil filter bracket and adapter already, working on mounting the bracket and running the hoses. Will be able to add my oil once i get it setup and run my modded distributor oil pump primer. Gettin there slowly. Should be lookin good by monday :ebiggrin


Your gonna luv it when you can fire it up. Nothing like that kind of pay off. How about the rest of the truck? Will it be road worthy when your done with the engine?

_________________
Fortune favors the well prepared!


Top
 Profile  
Reply with quote  
PostPosted: Fri Mar 07, 2014 6:35 pm 
Offline
Addicted to LUV
User avatar

Joined: Thu Jan 21, 2010 11:47 pm
Posts: 2944
Location: Vancouver, Washington
Chassis is ready other than the driveline im waiting on, still need to pick up a new ignition switch so my
Relay triggers have somewhere to go. And mount my battery/box in the bed. Beyond connecting a few wires and hoses its pretty much ready to drive. I wont have a speedometer but i have a good speedometer on my phone so i can figure out what rpm is what speed pretty quick.
Havent made the exhaust yet so thats another day of welding and testing. Gonna be another couple weeks before its road ready. Would be a lot easier if i lived with the truck still :roll:

_________________
Luvless :(
1980 Mikado-Sold.

1993 Lexus SC400 my Daily
2004 Yamaha WR250F my new love in life
2016 Toyota Camry my girls ride


Top
 Profile  
Reply with quote  
PostPosted: Fri Mar 07, 2014 6:38 pm 
Offline
Senior Member

Joined: Sun Jul 07, 2013 6:46 pm
Posts: 80
Location: Castaic, Ca
love4theluv wrote:
Chassis is ready other than the driveline im waiting on, still need to pick up a new ignition switch so my
Relay triggers have somewhere to go. And mount my battery/box in the bed. Beyond connecting a few wires and hoses its pretty much ready to drive. I wont have a speedometer but i have a good speedometer on my phone so i can figure out what rpm is what speed pretty quick.
Havent made the exhaust yet so thats another day of welding and testing. Gonna be another couple weeks before its road ready. Would be a lot easier if i lived with the truck still :roll:


Thats cool. I know what you mean about being close to the truck. Mine is 15 miles from me and the wife hates it when I stay here till 2 in the morning.

_________________
Fortune favors the well prepared!


Top
 Profile  
Reply with quote  
Display posts from previous:  Sort by  
Post new topic Reply to topic  [ 558 posts ]  Go to page Previous  1 ... 15, 16, 17, 18, 19, 20, 21 ... 28  Next

All times are UTC - 6 hours


Who is online

Users browsing this forum: No registered users and 4 guests


You cannot post new topics in this forum
You cannot reply to topics in this forum
You cannot edit your posts in this forum
You cannot delete your posts in this forum
You cannot post attachments in this forum

Search for:
Jump to:  
Powered by phpBB® Forum Software © phpBB Group