LUVTruck.com

phpBBV3 Message Board
It is currently Wed Sep 03, 2025 4:38 pm

All times are UTC - 6 hours


Post new topic Reply to topic  [ 558 posts ]  Go to page Previous  1 ... 13, 14, 15, 16, 17, 18, 19 ... 28  Next
Author Message
PostPosted: Sun Dec 01, 2013 5:34 pm 
Offline
Addicted to LUV
User avatar

Joined: Thu Jan 21, 2010 11:47 pm
Posts: 2944
Location: Vancouver, Washington
my dad and I got out there this morning and made some stuff happen

cut out a 3x3x1 1/4" raised pedestal for the tranny mount
Image

drilled a hole 1/2" forward of the centerline so between moving the engine/tranny back and the offset plus the ability to rotate the trans mount itself 180* I can make it set right on the xmember when I set the final location of the motor when the cab is back down.
Image

got the channel and plate cleaned up better and tacked together on both ends
Image

Image

drilled thru the frame and the plate and put 3/8" diameter grade 8 bolts thru them, and drilled the vertical holes out to accept 1/2" grade 8 bolts that still need to be shortened as you can see, this xmember isn't being made to handle all of the chassis ridgidity so I didn't want to put 3 or 4 bolts on each side its just to hold the tranny up and keep it stable but it should still do an alright job of helping keep things stiff
Image

dropped the xmember out and had my dad weld the plates on the rest of the way and I hit it with some automotive primer, I think this will work out pretty well how we made it
Image

layed down some of the johndeere black
Image

Image

after looking at the clearance I have I decided im going to weld the stock trans xmember back where it was 90% of the way except for cutting out a section on the passenger side and welding in the 4" pipe section. no reason to reinvent the wheel when I already have the stock xmember sitting on the floor ready to be sectioned out and welded back in. so I wont have a problem with frame strength on this end of the frame. up front im still trying to figure out of I should put the axle mounting plates back and weld the new xmember to them like the old axle was or make new plates in place of them and do it that way. will have to check out the clearance and where the best place to put it is going to be

_________________
Luvless :(
1980 Mikado-Sold.

1993 Lexus SC400 my Daily
2004 Yamaha WR250F my new love in life
2016 Toyota Camry my girls ride


Top
 Profile  
Reply with quote  
PostPosted: Sun Dec 01, 2013 7:49 pm 
Offline
Addicted to LUV

Joined: Fri Jul 01, 2005 9:41 pm
Posts: 6289
Location: Camarillo, CA
My front cross member is removable in case I need to drop the oil pan, my rear cross members are removable so I can remove the trans while leaving the engine in the truck. I was very glad that I was able to remove the trans without removing the engine when I had to replace my flexplate a couple months ago. If anyone runs the V8 hooker headers you have to lift the engine to get the headers out, so if I didn't have removable rear cross members for the trans I would have had to lift the engine, pull the headers and I am sure pulled a ton of my hair out too. Think ahead at this time and plan for the worse, you might be glad you did.

_________________
Certified pilots, looking down on people since 1903.


Top
 Profile  
Reply with quote  
PostPosted: Sun Dec 01, 2013 8:18 pm 
Offline
Addicted to LUV
User avatar

Joined: Thu Jan 21, 2010 11:47 pm
Posts: 2944
Location: Vancouver, Washington
Yeah my dad and i spent a whike today talking over what the next few headaches may be the exhaust camenup as well as the rear xmember. The stock trans xmember is far enough back to slide the trans back and drop it down with the truck on stands. Im going to spend some time working out the front end. Do you have a pic of what the stock one and what yours looks like now?

_________________
Luvless :(
1980 Mikado-Sold.

1993 Lexus SC400 my Daily
2004 Yamaha WR250F my new love in life
2016 Toyota Camry my girls ride


Top
 Profile  
Reply with quote  
PostPosted: Sun Dec 01, 2013 9:00 pm 
Offline
Addicted to LUV

Joined: Fri Jul 01, 2005 9:41 pm
Posts: 6289
Location: Camarillo, CA
The 2WD frame gas a bolt in front cross member, I just lowered mine. My truck is too low to climb under it for a picture but here is one from the parts manual. The 4WD frame does not have the holes or the tabs like the 2WD. Look at #18.


Attachments:
image.jpg
image.jpg [ 254.9 KiB | Viewed 15974 times ]

_________________
Certified pilots, looking down on people since 1903.
Top
 Profile  
Reply with quote  
PostPosted: Sun Dec 01, 2013 10:19 pm 
Offline
Addicted to LUV
User avatar

Joined: Thu Jan 21, 2010 11:47 pm
Posts: 2944
Location: Vancouver, Washington
Sweet thanks. That looks way different than the 4x4 mount, it looks like the middle unbolts? Would be cool to find one at picknpull. I think i can use the 4x4 bolt in mount plates and build off of them to make a xmember. Would be nice to not start from scratch they are in about the same spot. The rear trans xmember should be made in the next couple days whenever i get time to go work on it. Just gotta find a 4"dia x 3" section of pipe to weld in.. really glad i bought that welder saving so much down time

_________________
Luvless :(
1980 Mikado-Sold.

1993 Lexus SC400 my Daily
2004 Yamaha WR250F my new love in life
2016 Toyota Camry my girls ride


Top
 Profile  
Reply with quote  
PostPosted: Sat Dec 07, 2013 10:36 pm 
Offline
Addicted to LUV
User avatar

Joined: Thu Jan 21, 2010 11:47 pm
Posts: 2944
Location: Vancouver, Washington
Been in the 20s the last few days and low teens at night so i havent been able to get any more paint sprayed. Taping the plastic up around my garage door and breaking out another space heater overnight to try and bring it up closer to 60* so i can get the blue sprayed and drop the cab back on. Have to get the engine compartment painted before i drop the cab again.

_________________
Luvless :(
1980 Mikado-Sold.

1993 Lexus SC400 my Daily
2004 Yamaha WR250F my new love in life
2016 Toyota Camry my girls ride


Top
 Profile  
Reply with quote  
PostPosted: Wed Dec 11, 2013 12:15 am 
Offline
Addicted to LUV
User avatar

Joined: Thu Jan 21, 2010 11:47 pm
Posts: 2944
Location: Vancouver, Washington
another step down xmember for the exhaust to go thru

one pipe end tacked on, other was just sitting there while I marked the rest to grind off, you can see the ugly welds from fixing the big cut I made in it. its ugly because that's the first thing I have ever welded completely :lol: I dislocated my shoulder last night so I was working left handed with my right in a sling today :roll:
Image

Image

we cut the notches so it will hold itself up, there was barely any gap on either end, my dad did the cutting and most of the grinding today and I did the welding
Image

pulled it back out and welded I the rest of the way.. my technique needs some work but its getting better pretty fast, using some of the misc scrap pieces to practice on
Image

Image

popped it back in place again, its so tightly fit it holds itself in place
Image

going to cut the pipes down to the width of the xmember
Image

welding improving slowly
Image

_________________
Luvless :(
1980 Mikado-Sold.

1993 Lexus SC400 my Daily
2004 Yamaha WR250F my new love in life
2016 Toyota Camry my girls ride


Top
 Profile  
Reply with quote  
PostPosted: Wed Dec 11, 2013 3:07 pm 
Offline
Addicted to LUV
User avatar

Joined: Thu Jan 21, 2010 11:47 pm
Posts: 2944
Location: Vancouver, Washington
Back to it this morning more lefty welding but i got it done
Image

You can see where the right side was welded in on both sides of the tbar from where i chopped it out to clear the tcase.
On the other side we just cut and ground out the curve of the pipe and welded it in
Image


Image

Image

Here in a little while i will go down and give it a coat of the jd black paint and it will be good to go.
When i am out of this ling in a couple days i will get to putting the cab down again

Edit: painted the new section
Image

Prepped for the next coat. Will be spraying it shortly and have another edit to make
Image

_________________
Luvless :(
1980 Mikado-Sold.

1993 Lexus SC400 my Daily
2004 Yamaha WR250F my new love in life
2016 Toyota Camry my girls ride


Top
 Profile  
Reply with quote  
PostPosted: Wed Dec 11, 2013 9:33 pm 
Offline
Addicted to LUV
User avatar

Joined: Thu Jan 21, 2010 11:47 pm
Posts: 2944
Location: Vancouver, Washington
update
first two coats sprayed around the front. this is the only part getting this paint. the outside of the body will be painted in my uncles booth with a paint gun, I just wanted this done now so I don't have to mask the whole area off to paint it later


Image


Image

Image

_________________
Luvless :(
1980 Mikado-Sold.

1993 Lexus SC400 my Daily
2004 Yamaha WR250F my new love in life
2016 Toyota Camry my girls ride


Top
 Profile  
Reply with quote  
PostPosted: Fri Dec 13, 2013 3:12 pm 
Offline
Addicted to LUV
User avatar

Joined: Thu Jan 21, 2010 11:47 pm
Posts: 2944
Location: Vancouver, Washington
The cab/front clip is on the way back onto the chassis. So far it looks like everything is actually going to clear. If i need to do anything to the trans tunnel its going to be very minor, the shifter hole actually lines up too. Will post pics when i take some

Apparently next week is pretty barren for hours at work so im gonna see what kinda progress i can make on reassembling the truck
planning to get the cab back on
bed back on and finalize the engine and tranny locations
Work on my radiator mount brackets
Start making my new seat rails
drop my drivelines off at the shop to get the new rear one made
Order a clutch kit and master cylinder
Etc.... tons to do once the cabs back down

_________________
Luvless :(
1980 Mikado-Sold.

1993 Lexus SC400 my Daily
2004 Yamaha WR250F my new love in life
2016 Toyota Camry my girls ride


Top
 Profile  
Reply with quote  
PostPosted: Fri Dec 13, 2013 3:38 pm 
Offline
Addicted to LUV

Joined: Fri Jul 01, 2005 9:41 pm
Posts: 6289
Location: Camarillo, CA
When I did my truck I actually installed the trans/engine then put the cab on over it. For me it was easier that way.

_________________
Certified pilots, looking down on people since 1903.


Top
 Profile  
Reply with quote  
PostPosted: Fri Dec 13, 2013 4:15 pm 
Offline
Addicted to LUV
User avatar

Joined: Thu Jan 21, 2010 11:47 pm
Posts: 2944
Location: Vancouver, Washington
Luvrv8 wrote:
When I did my truck I actually installed the trans/engine then put the cab on over it. For me it was easier that way.


Yep thats how we're doing it, engine and trans are in but the motor mount plates are loose bolted amd the trans mount box isnt welded to the xmember yet so i can still move it a bit front to back to get it fit just right with the distributor up close to the firewall

Once its on the bed will be on within a couple hours and i can start getting the wiring harness laid back out, thank god i labeled it all!! I only need to change the ends of the wires that used to go to the pull knobs and the heater blower motor and run them to the new switches should only take a day or so to get it back in there, was looking into a ford type inertia switch with the reset button on the fuel line toggle circuit, maybe put it in the middle of the switch panel to make it accessible and more safe.
.
Im moving at the end of january so i would really like to get the truck finished by then so i dont have to drive across town to work on it. Im pretty confident i can get it knocked out. Wont have the new gauges by then by i can hook up the old ones and the tach i had and use my ulysee gps speedo app for a while.

_________________
Luvless :(
1980 Mikado-Sold.

1993 Lexus SC400 my Daily
2004 Yamaha WR250F my new love in life
2016 Toyota Camry my girls ride


Top
 Profile  
Reply with quote  
PostPosted: Fri Dec 13, 2013 6:40 pm 
Offline
LUVTruck.com Guru
User avatar

Joined: Wed Jan 25, 2012 12:37 am
Posts: 173
Location: Washington.
Luvrv8 wrote:
When I did my truck I actually installed the trans/engine then put the cab on over it. For me it was easier that way.


That's how I did mine as well.

_________________
My names Trevor BTW. ;)


Top
 Profile  
Reply with quote  
PostPosted: Fri Dec 13, 2013 6:55 pm 
Offline
Addicted to LUV

Joined: Fri Jul 01, 2005 9:41 pm
Posts: 6289
Location: Camarillo, CA
What I was trying to say is install them and finish the installation before the cab. If you pull the trans to do the clutch after the cab is on to me that is working backwards.

_________________
Certified pilots, looking down on people since 1903.


Top
 Profile  
Reply with quote  
PostPosted: Fri Dec 13, 2013 8:03 pm 
Offline
Addicted to LUV
User avatar

Joined: Thu Jan 21, 2010 11:47 pm
Posts: 2944
Location: Vancouver, Washington
Luvrv8 wrote:
What I was trying to say is install them and finish the installation before the cab. If you pull the trans to do the clutch after the cab is on to me that is working backwards.

I need to do it this way to save time my deadline is coming up and i need to order a clutch next friday on payday i could have the next few steps done by then im off sun-thursday so i have a ton of time. Its kind of inconvenient but i will be able to pull it back enough to Install the clutch with the cab on. We factored that into how high we set the center of the welded in xmember.

I have a big list of stuff to do this week then when i get paid i can order a clutch and get my driveline made while im installing my radiator etc while the parts come instead of wasting a week of valuable time.
Whatever i can do that doesntcost money im going to do t his week. Cab is going to be bolted down tomorrow morning and bed will follow. Getting excited now

_________________
Luvless :(
1980 Mikado-Sold.

1993 Lexus SC400 my Daily
2004 Yamaha WR250F my new love in life
2016 Toyota Camry my girls ride


Top
 Profile  
Reply with quote  
PostPosted: Sat Dec 14, 2013 7:58 pm 
Offline
Addicted to LUV
User avatar

Joined: Thu Jan 21, 2010 11:47 pm
Posts: 2944
Location: Vancouver, Washington
the to do list got a little bit shorter today :ebiggrin

got the cab dropped back on and bolted down
Image

the shifter hole came so close to the stock spot, took minor trimming but its in there now
Image

the powerbyace motor mounts dont go where i want it so im going to replace the plate so i can get them right where they are pictured here, the way they go made it sit too far back and reversing them (left on right) was too far forward and i couldnt get it just right so i am working on a new plate to bolt them to so i can keep it right where i want it. Image

different angle but this is where i want it to sit, it gives me room to get a box wrench on the bellhousing bolts which was a huge PITA pulling the trans out of the s10 at the yard, leaves good clearance for the distributor, has plenty of space for the radiator, fan and pulleys, lines up with the shifter hole, etc it just works
Image

will wind up something like this, this isnt quite where it was in the above pic but its real close
Image

Image


the way it is sitting here i can get the trans back enough to get to the clutch, or i can pull the engine/radiator and get to the clutch and such without pulling the trans, either way will work i tried both out. there is plenty of clearance around the transmission on all sides the only place that had any issue was the shifter hole the rest went on just fine... there is so much to do still but this is a huge step out of the way.

_________________
Luvless :(
1980 Mikado-Sold.

1993 Lexus SC400 my Daily
2004 Yamaha WR250F my new love in life
2016 Toyota Camry my girls ride


Top
 Profile  
Reply with quote  
PostPosted: Sun Dec 15, 2013 10:32 pm 
Offline
Addicted to LUV
User avatar

Joined: Thu Jan 21, 2010 11:47 pm
Posts: 2944
Location: Vancouver, Washington
Got the majority of my wiring harness put back where it goes
Image

I like how isuzu did the wiring hangers all along the inside of the compartment and under the dash, keeps everything out of the way. I still need to rewrap all the wiring after i finish modifying the harness for the new switch panel and relay box

Image

Need to change a bit of this wiring still but almost all of whats visible here is staying, im changing the headlight, heater and wiper switches, adding a fuel pump toggle with a resettable inertia switch, manual fan override etc.

Image

The nerve center of the whole wiring operation, tons of extra wiring from extra crap i cut out of the plus wire i had in a box, relays connectors etc i have a ton of extras to work with. The stock wiring system left a lot to be desired

Image

_________________
Luvless :(
1980 Mikado-Sold.

1993 Lexus SC400 my Daily
2004 Yamaha WR250F my new love in life
2016 Toyota Camry my girls ride


Top
 Profile  
Reply with quote  
PostPosted: Wed Dec 18, 2013 11:17 pm 
Offline
Addicted to LUV
User avatar

Joined: Thu Jan 21, 2010 11:47 pm
Posts: 2944
Location: Vancouver, Washington
sorry no pics today wiring isn't very exciting to look at :lol:
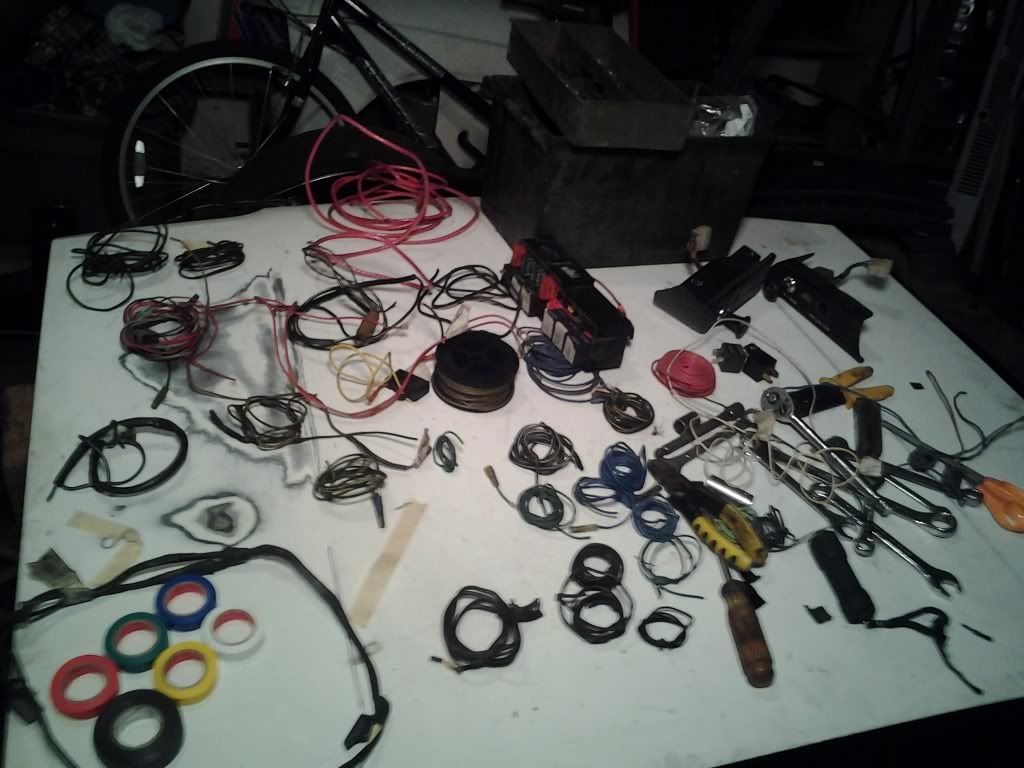
spent a TON of time on Microsoft paint editing down the wiring diagram to make it easier to follow the light circuits, was way too confusing to follow the lines on the full diagram its easy to follow now.
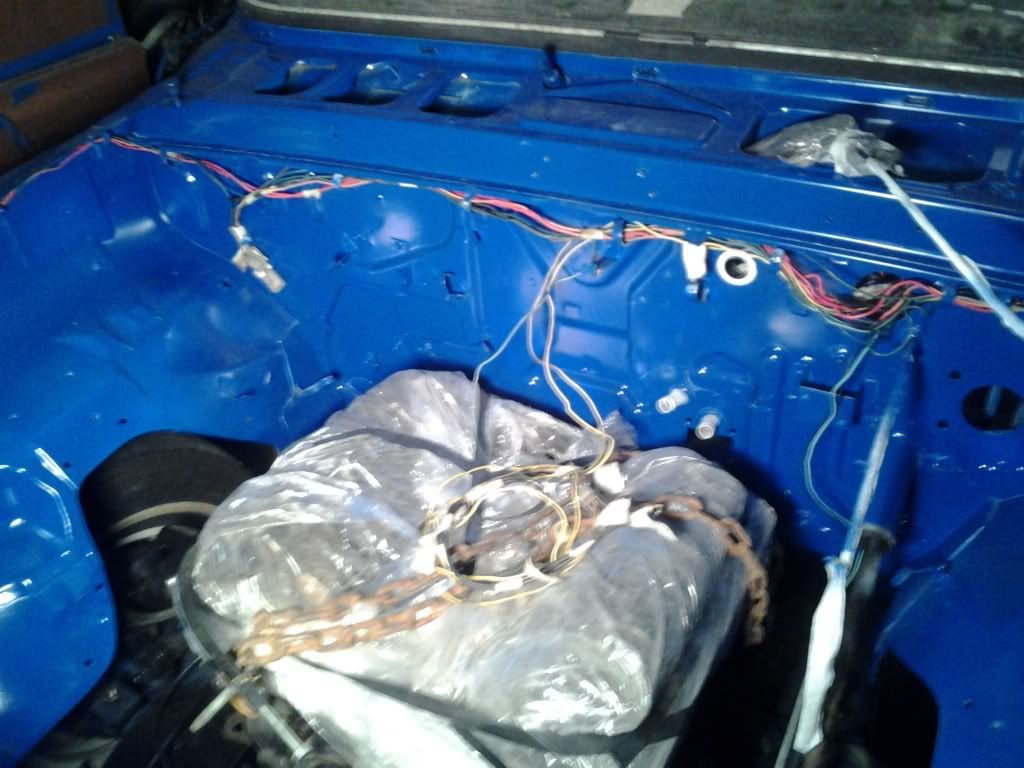
finally got it narrowed down enough to find the ends of the wires I needed, got the power wires to all the lights (two wires) found and ran to the relay box
ran a new wire to the fuel pump with spade connectors this time and ran it to the new relay box
got the grounds all hooked back up,
was able to take the headlight plugs with about 12" of wiring and splice/solder them in line with the stock light plugs so all 4 lights will work hi/lo and will order 4 of the hi/lo bulbs to go with the new system, should be a clean lookin conversion to the old 4 light grill
my wiring is about 80% sorted out still need to pick up a new ignition switch so I can run the trigger wires to the relays for acc, run and start circuits. thinking about setting up a heavy duty cutoff switch in line with the amp so I don't always have to deafen myself when I don't want to have the bass, going to have to put a capacitor in this time so my alt doesn't have to work so hard to keep up and the amp will have a steady power supply

im trying to figure out if my reverse lights not working was a wiring issue or if its a problem with the light sockets, they are pretty nasty, I picked up a multi-meter so I can get this all done more accurately and waste less time being that I don't have a lot of time to waste.

also reattached the fuel hardlines to the under side of the cab and removed the vapor recovery line, need to pick up a vented gas cap or put a vent line in place of the old vapor line.

and got the rails removed from the driver seat, working on the best setup, either connect my stock rails to the seats and keep the ability to slide, which is kinds pointless the footprint of these seats is pretty big, or just attach the bottom part of the stock rails welded on tabs to the top rail of these ones, going to need a rubber isolator between them and the floor, my passenger side seat kept getting vibrated loose by the sub behind it. I have enough of them sitting in a misc parts box I can use that should work real well. going to put rubber washers between anything in the cab that can rattle I cant stand rattles from bass :lol:

_________________
Luvless :(
1980 Mikado-Sold.

1993 Lexus SC400 my Daily
2004 Yamaha WR250F my new love in life
2016 Toyota Camry my girls ride


Top
 Profile  
Reply with quote  
PostPosted: Thu Dec 19, 2013 11:30 pm 
Offline
Addicted to LUV
User avatar

Joined: Thu Jan 21, 2010 11:47 pm
Posts: 2944
Location: Vancouver, Washington
Did more fiddling with the wiring today gettin there slowly.

Got the lower rails with the motors etc taken off my volvo seats and set them in to see how they sit
Image

Going to need to cut the upper rails on the seats way back in the front to get it to sit on the stock lower rails. Trying to get the seats low they are pretty tall.
Image

_________________
Luvless :(
1980 Mikado-Sold.

1993 Lexus SC400 my Daily
2004 Yamaha WR250F my new love in life
2016 Toyota Camry my girls ride


Top
 Profile  
Reply with quote  
PostPosted: Wed Dec 25, 2013 1:13 am 
Offline
Addicted to LUV
User avatar

Joined: Thu Jan 21, 2010 11:47 pm
Posts: 2944
Location: Vancouver, Washington
No pics tonight didnt have my phone on me. will get some tomorrow morning.
Got the bed back on and bolted down. Removed the vapor line from the tank and took the charcoal canister out of the bed.
Put my cowl amd fenders back on and wired up the signal lights.Going to splice them inline with the blinkers when i put the bumper on.
Got the stock lower seat rails seperated from the upper half. Took some grinding, drilling and the hammer but i got them off. I need to cut down the volvo rails to mount them where i want height wise.
Also welded the tranny xmember mount pedestal down and painted it like the rest. The steel yard was closed today so gonna have to wait until thursday to make new motor mount plates and get started on the xmember under the engine. Looking at welding it to the frame right below the motor mounts made from 3x4 rectangle tube with a center section removable so i can pull the oil pan. With a few good sized bolts on both sides

_________________
Luvless :(
1980 Mikado-Sold.

1993 Lexus SC400 my Daily
2004 Yamaha WR250F my new love in life
2016 Toyota Camry my girls ride


Top
 Profile  
Reply with quote  
Display posts from previous:  Sort by  
Post new topic Reply to topic  [ 558 posts ]  Go to page Previous  1 ... 13, 14, 15, 16, 17, 18, 19 ... 28  Next

All times are UTC - 6 hours


Who is online

Users browsing this forum: No registered users and 18 guests


You cannot post new topics in this forum
You cannot reply to topics in this forum
You cannot edit your posts in this forum
You cannot delete your posts in this forum
You cannot post attachments in this forum

Search for:
Jump to:  
Powered by phpBB® Forum Software © phpBB Group